


Author: Site Editor Publish Time: 2025-11-27 Origin: Site


PV paste drying, glass preheating and module encapsulation have different thermal requirements. Match the process stage to industrial infrared lamps and systems and controls. Infrared heat alone does not replace a qualified encapsulation or firing process.
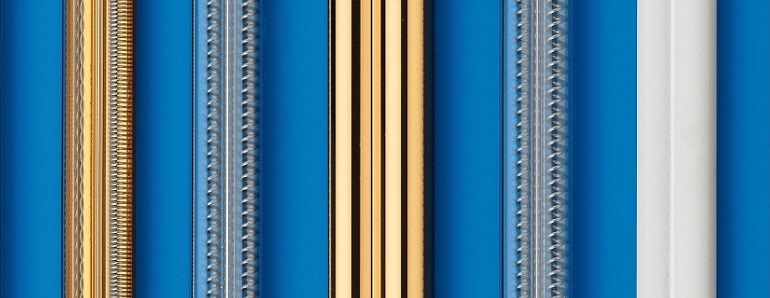
Product configuration examples. Suitability depends on the selected PV process and qualified installation.
Modern photovoltaic (PV) manufacturers face constant pressure to increase cell and module efficiency while lowering cost per watt. This article explains how quartz infrared heating lamps for photovoltaic industry applications can help plant engineers, OEM/ODM designers, and line integrators achieve faster heating, tighter process control, and more energy-efficient production across wafer, cell, and module processes.
By the end, you will have a practical selection and integration guide for using infrared heating for solar panel production, including application considerations, process validation and a measured business-case method.
Typical process
Specify the current cell technology, wafer thickness and metallization system; these vary by production design.
Coatings: silver/aluminum screen-printed pastes for front and rear contacts
Set conveyor speed from the available dryer length and the paste supplier’s qualified drying window.
Define the drying temperature profile with the paste supplier and confirm it on representative cells before production release.
Pain points of conventional heating
Many legacy lines use long hot-air tunnels or hot plates to dry pastes before firing:
Long, space-intensive dryers to achieve sufficient dwell time
Slow thermal response; difficult to adapt to recipe or product changes
Non-uniform drying across the wafer width, leading to contact resistance variation or micro-cracking
High air volumes and exhaust requirements, adding fan and burner/electric costs
How infrared heating changes the game
Quartz IR lamps place energy exactly where it is needed – into the paste and the wafer surface:
Fast response: short wave infrared heating for silicon wafer processing can ramp power in seconds when controlled by SSR/SCR, reducing start-up and changeover time.
Selective heating: higher absorption by printed pastes and wafer surfaces enables effective drying with shorter zones.
Compact footprint: drying zones can be significantly shorter versus pure convection, freeing valuable floor space.
Better uniformity: optimized reflector geometry and multi-zone control support tight temperature uniformity across the wafer width.
Huai’an Yinfrared solution fit
Short-wave quartz IR heating lamps mounted in modular cassettes above/below the wafer conveyor.
Multi-zone, closed-loop power control for each lane or zone.
Optional compact infrared ovens integrated upstream of existing firing furnaces.
Typical process
Specify glass type, thickness, coating and handling requirements.
Steps: glass preheating before AR coating, sol-gel or other thin-film deposition, or drying/annealing of AR coatings
Line speed: several meters per minute on horizontal lines
Define glass-surface and coating-temperature limits from the coating supplier’s specification, then validate ramp rate and uniformity on production-size panels.
Pain points of conventional heating
Traditional gas or electric convection ovens:
Require long heating tunnels due to slow heat transfer through glass thickness.
Introduce non-uniform temperature profiles, especially near edges.
Increase risk of contamination due to large airflows.
Are slow to start and respond poorly to partial loads or product gaps.
How infrared heating changes the game
Quartz IR preheating brings energy directly to the glass surface:
Higher surface flux: short- and medium-wave quartz IR can deliver high power density onto the top surface without excessively heating the bulk or equipment.
Better process control: zoning along the glass width compensates for edge losses, improving coating uniformity.
Reduced air movement: less dependence on high-volume hot air can reduce particle transport in sensitive coating environments.
Flexible operation: IR zones can be turned down or off during gaps, reducing idle energy consumption.
Huai’an Yinfrared solution fit
Medium-wave quartz IR modules for uniform heating across wide glass panels.
Short-wave quartz IR lamps for rapid top-surface boosts ahead of AR coating stations.
Compact infrared ovens with multi-zone control to integrate into existing glass lines.
Typical process
Stack: front glass + encapsulant (EVA/POE) + cells/string + encapsulant + backsheet or dual-glass
Steps: preheating, degassing, lamination/curing, and cooling
Set laminate temperature and dwell time from the encapsulant supplier’s qualified process window, then verify the result on the actual module stack.
Pain points of conventional heating
Many laminators rely largely on conduction and convection:
Long cycle times due to heating thick, multi-layer stacks via heavy platens.
Non-uniform temperatures between edge and center, leading to incomplete curing or bubbles.
Limited ability to de-bottleneck lamination without major capital investment.
How infrared heating changes the game
Infrared heating supports both thin-film and crystalline module lamination:
Preheating with IR: additional IR zones preheat glass and encapsulant before entering the laminator, reducing press time and improving throughput.
Fast thin-film curing: in thin-film processes, quartz infrared heating lamps can rapidly cure thin functional layers, ensuring adhesion and electrical performance while minimizing thermal stress.
Profile control: multi-zone IR arrays allow different heating profiles for edges and center, reducing defects.
Huai’an Yinfrared solution fit
Compact infrared ovens for PV lines placed before laminators or in stand-alone curing steps.
Combination of short-wave quartz IR lamps for fast surface activation and medium-wave modules where trials demonstrate suitable absorption and temperature distribution.
Long-wave IR panels or cassettes for gentle heating of backsheets and polymer films where lower temperatures are required.
Pro tip for plant engineers: When adding IR preheating to existing laminators, start with modest power densities and a conservative thermal profile, then iterate with real module temperature measurements before pushing to maximum throughput.
Designing effective infrared heating for solar panel production requires understanding a few core parameters. Below is a concise guide to the most important ones.
Quartz emitters produce a spectrum rather than a single wavelength. Evaluate the actual glass, paste, polymer and cell stack: absorption depends on wavelength, thickness, pigmentation and surface condition. Medium- or long-wave labels do not imply deeper penetration or inherently gentle heating. Select the spectrum, geometry and exposure together through material trials.
Definition:
Total power (kW) = overall installed IR power.
Power density (kW/m²) = power per unit area of product or lamp face.
Why it matters: Power density directly influences how fast you can heat the product at a given working distance. Too low, and you will not hit the target temperature within the available dwell time; too high, and you risk scorching or thermal stress.
Typical ranges (order of magnitude):
For wafer and paste drying, determine the starting heat flux from the required ramp rate, dwell time and allowable cell temperature.
For glass or coating preheating, size the zones from panel width, material absorption, edge losses and conveyor speed.
For encapsulant or polymer layers, begin conservatively and confirm surface-to-core temperature gradients during trials.
Actual values depend on line speed, temperature, and absorption.
Quartz tube (single-tube, short-wave): Very fast response, high power density; ideal for wafer processes and fast boosts.
Twin-tube or medium-wave quartz emitters: Robust and suitable for wide glass or coating lines.
Long-wave IR panels or cassettes: Lower power density; suited for backsheets, films, and low-temperature heating.
Cassette modules: Pre-assembled arrays including reflectors, insulation, and mounting, simplifying line integration.
Definition: The physical dimensions of lamps and modules, and how they are grouped into controllable zones.
Why it matters: Proper zoning allows independent control across the width and along the line. This is critical for compensating edge losses and product gaps.
Good practice:
Use narrower zones across the width to trim edge versus center temperatures.
Segment along the line for preheat, soak, and cool-down regions.
Emitter temperature: Higher emitter temperatures generally shift emission towards shorter wavelengths and increase power density.
Response time: Short-wave quartz lamps can reach operating temperature in a few seconds; medium-wave elements are somewhat slower; panels slower again.
Impact: Fast response is valuable for recipes with frequent changeovers or where product flow is intermittent.
Set the initial working distance through uniformity trials while accounting for emitter geometry, reflectors, shielding and maintenance clearance.
Impact:
Shorter distances increase power flux but require precise mechanical alignment and shielding.
Larger distances reduce flux and may require higher power or more lamps.
Line layout: Ensure enough straight length for IR zones, plus maintenance access and shielding from adjacent equipment.
On/Off only: Simple, but usually insufficient for critical PV processes.
Phase-angle or burst-firing via SSR/SCR: Allows variable power output; coordinate with plant power quality requirements.
Closed-loop PID control: Uses temperature or power feedback to maintain setpoints.
PLC/fieldbus integration: For complex lines, integrating IR zones into the line PLC via fieldbus simplifies recipe management and data logging.
Enclosures: Stainless or coated steel housings protect lamps and manage airflow.
Insulation: Reduces heat losses and protects structural components.
IP rating: Consider dust, humidity, and any chemical vapors from coatings; select appropriate protection for electrical components.
| Infrared Solution Type | Wavelength Band | Typical Power Density | Response Time | Recommended Applications | Control Options |
|---|---|---|---|---|---|
| Short-wave quartz IR lamp | Short-wave | High | Very fast | Silicon wafer heating, fast PV glass preheating | On/Off, SSR, SCR, PID |
| Medium-wave quartz IR module | Medium-wave | Medium–high | Fast | PV glass tempering, coating drying, encapsulant preheating | On/Off, SSR, SCR, PID |
| Long-wave IR panel or cassette | Long-wave | Medium | Medium | Backsheet drying, low-temperature heating of polymer layers | On/Off, SSR, basic PID |
| Custom infrared oven for PV line | Mixed | Application-specific | Fast–medium | Integrated PV module lamination and curing, multi-zone control | PLC/fieldbus, advanced PID |
If/then rules of thumb
If your main target is silicon wafers or metallization pastes and you need very short dwell times → prioritize short-wave quartz IR lamps with high power density.
If you are preheating or drying PV glass or AR coatings → consider medium-wave quartz IR modules for good absorption and uniformity.
If you are heating backsheets, adhesives, or thick polymer layers at lower temperatures → use long-wave panels or low-power medium-wave emitters.
If your line requires frequent recipe changes or stop-and-go operation → select fast-response lamps with SCR/SSR control and closed-loop PID.
If space is limited but you need a complete solution → consider a compact custom infrared heating solution integrating emitters, reflectors, and controls.
Mini decision flow
Step 1 – Define process:
Target material? (silicon / glass / coating / polymer)
Target surface temperature and allowable ramp rate?
Available dwell time and line speed?
Step 2 – Choose wavelength:
If high-temp, short dwell, thin inorganic layers → short-wave
Else if glass/coatings at moderate temperatures → medium-wave
Else if low-temperature polymeric layers → long-wave or low-power medium-wave
Step 3 – Size power density:
Estimate required kW/m² based on temperature rise and dwell time.
Apply a safety factor for losses and edge effects.
Step 4 – Decide on control:
Simple, stable load → on/off or basic SSR.
Critical PV process or mixed product → SCR + closed-loop PID via PLC.
Step 5 – Engineer mechanics:
Check working distance, maintenance access, shielding, and integration with existing equipment.
At this stage, many engineers find it helpful to review reference design patterns for similar photovoltaic infrared heating applications.
Mains voltage and phase:
Match lamp circuits and power control to the available supply, including phase loading, protection, current and cooling requirements.
Clearly define supply voltage, tolerance, and short-circuit capacity early in the design.
Wiring and protections:
Use appropriately rated cables, terminals, and protective devices (fuses/MCBs) based on lamp current and ambient temperature in the heater enclosure.
Group lamps in logical circuits (zones) to simplify diagnostics; label circuits clearly for maintenance.
Control strategies:
On/Off via contactors: acceptable for non-critical, slow processes.
Solid-state relays (SSR) using time-proportional control: good for many medium-power zones.
Silicon-controlled rectifiers (SCR) with phase-angle or zero-cross control: best for high-power, dynamic PV processes.
Integrate temperature controllers or power controllers into the line PLC through fieldbus where possible.
Typical control cabinet layout:
Main isolator and safety lockout.
Power distribution and protection per zone.
SCR/SSR stacks plus heat sinks and forced ventilation.
PLC and safety relays (emergency stop, interlocks for doors, fans, over-temperature).
Mounting options:
Frames and cassettes that can drop into existing slots in convection ovens.
Overhead modules mounted above conveyors, with adjustable height.
Side-mounted emitters for edge heating or custom geometries.
Distance from heater to product:
Confirm the final heater-to-product distance on representative parts at production speed and record the approved setting in the process specification.
Allow for mechanical tolerances and product flatness.
Line speed and dwell time:
Dwell time = heated length / line speed.
Use dwell time to back-calculate required power density. Faster lines need higher power density or longer IR zones.
Reflectors, shielding, and insulation:
Specular reflectors (polished aluminum or coated surfaces) can redirect IR onto the product, improving efficiency.
Shields protect operators and adjacent equipment from stray radiation.
Insulation reduces losses and protects frames.
Maintenance and access:
Provide quick-release mechanisms or sliding racks to change lamps.
Design front or side access panels with interlocks to de-energize IR zones when open.
Defining the heating profile:
Start by specifying target product temperatures (surface and core), acceptable ramp rates, and soak times.
Use this as the basis for dividing zones into preheat, soak, and controlled cool-down.
Instrumenting the process:
Use thermocouples attached to representative modules, wafers, or glass panels to validate real temperatures.
Non-contact IR pyrometers help monitor surface temperatures during operation, especially for moving products.
From trial-and-error to structured testing:
Begin with conservative power settings.
Adjust one variable at a time (power, line speed, or working distance) while logging temperatures and product quality.
Converge towards stable “recipes” for each product type.
Defect reduction examples:
Lower edge defects by slightly increasing edge-zone power while monitoring module temperature uniformity.
Avoid scorching of backsheets by limiting long-wave panel temperatures and using PID control based on film surface temperature.
Lab tests on samples:
Use a lab or bench-top IR test stand to establish basic heating curves for wafers, glass, and module stacks.
Record time-to-temperature under different power density and distance settings.
Pilot line or test zone:
Implement a short IR zone in an existing line for pilot trials.
Validate process windows for a small subset of products before rolling out full-scale systems.
Full-scale acceptance criteria:
Throughput: modules/hour or m/min at specified product mix.
Temperature uniformity: for example, within a defined range across module area, depending on process criticality.
Specific energy consumption: kWh per module or per m² of glass, compared to baseline convection.
Product quality metrics: cell efficiency distribution, adhesion test results, visual defect rate, encapsulant cure indicators.
Standards and directives (examples):
In many regions, IR equipment forms part of a larger machine that must comply with relevant safety frameworks. In Europe, this may involve CE marking under Low Voltage, EMC, and Machinery directives.
In North America, IR assemblies in PV lines may be evaluated under UL/CSA standards for industrial heating equipment.
Material compliance (for example, RoHS and REACH in the EU) is relevant to lamp materials, wiring, and coatings.
High surface temperature and burn risk:
Infrared emitters can operate at very high surface temperatures. Guarding, warning labels, and interlocks are essential to protect operators.
Design guards to avoid trapping excessive heat while preventing accidental contact.
Fire prevention and over-temperature protection:
Maintain clearances to combustible materials such as packaging, cable trays, and polymer films.
Use over-temperature sensors on heaters and enclosures tied to safety shutdown circuits.
Electrical safety:
Ensure proper grounding of all metallic enclosures.
Apply appropriate overcurrent and short-circuit protection.
Integrate IR systems into the line’s emergency stop chain.
At specification stage, many buyers appreciate direct access to compliance and documentation resources to align system design with local standards.
Confirm the scope of supply, drawings, electrical interfaces, spare parts, acceptance tests and support for the individual project. Sampling, lead time, order quantity and certification documentation depend on the selected configuration and should be agreed in the quotation.
Compare total energy, accepted throughput, yield, maintenance and downtime against the existing process. Keep material, required quality and operating hours comparable. A useful energy metric is total process kWh divided by accepted units or area. Include relevant fans, exhaust and cooling.
Calculate payback from an agreed installed cost and measured recurring savings. Include installation, controls, commissioning and validation costs rather than presenting a lamp-only estimate as a complete retrofit budget.
Choosing the wrong wavelength band
Pitfall: using long-wave panels for fast wafer drying.
Fix: align wavelength with material absorption; for wafers and metallization pastes, start with short-wave quartz IR.
Under-sizing power or over-estimating dwell time
Pitfall: designing for nominal line speed but ignoring future speed increases.
Fix: include a margin in power density and zoning for process optimization and future debottlenecking.
Neglecting insulation and reflectors
Pitfall: running high-power lamps in poorly insulated housings, wasting energy.
Fix: use proper insulation and reflective surfaces to direct heat onto the product.
Poor mechanical integration
Pitfall: placing IR modules too far from the product or allowing shadowing from clamps and support structures.
Fix: check line geometry and design mounting frames to maintain consistent working distance.
Ignoring safety from the start
Pitfall: retrofitting IR into existing lines without addressing guarding, interlocks, and over-temperature protection.
Fix: involve EHS and compliance experts early; treat IR zones as part of the overall machine safety system.
Inadequate process monitoring
Pitfall: running critical PV processes without reliable temperature feedback.
Fix: instrument with thermocouples and/or IR pyrometers and integrate readings into the control strategy.
Define the required material-temperature profile and uniformity, coating or bond quality, electrical performance and allowable defects. Validate from sample trials to pilot and production runs. Numerical acceptance limits must come from the process specification, not a general industry range.
Confirm dimensional and electrical inspection, testing, traceability and supplied records in the project specification. Do not assume that every custom configuration includes identical testing or documentation.
Use material properties, required thermal profile, throughput and available geometry. Validate initial sizing with representative parts and a suitable temperature measurement method.
No. Compare complete process energy per accepted unit against a documented baseline at the same quality and output.
Voltage, cycling, mounting, cooling and contamination all matter. Obtain a specification for the selected lamp and operating conditions.
Potentially. Review space, controls, shielding and the downstream process before trials. Preheating does not replace qualified lamination, firing or encapsulation requirements.
Last updated: September 8, 2026


